Welding
Several of the companies I’m currently pursuing for interviews rely on welding for some portion of their operations, so I wanted to refresh that technology in my mind. Welding is defined as “a materials joining process in which two or more parts are coalesced at their contacting surfaces by a suitable application of heat and/or pressure [1].” Fusion welding–in which heat is used to melt and join the base materials with a filler metal sometimes added–is described here. Solid-state welding is less common, but includes diffusion welding (two surfaces held together under pressure at high temperature, allowing atomic diffusion/fusion to occur), friction welding (friction between the two surfaces generates the heat for coalescence), and ultrasonic welding (moderate pressure is applied between the parts while an ultrasonic oscillation parallel to the contacting surfaces achieves atomic bonding) [1]. The following post will be divided into the following sections:
- Surface Preparation
- Weld Joint Geometry
- Safety
- The Various Welding Technologies
- Oxyfuel
- Oxyacetylene
- Arc Welding
- Consumable Electrode
- Shielded Metal Arc (stick welding)
- Gas Metal Arc
- Submerged Arc
- Nonconsumable Electrode
- Gas Tungsten Arc (TIG)
- Resistance Welding
- Resistance Spot Welding
- Resistance Seam Welding
- Resistance Projection Welding
- Heat Sealing
- Oxyfuel
- Design Factors; Strength & Fatigue
Surface Preparation
Typically, the surface which is to be welded has to prepared–cleaned of surface contaminants and oxides to expose fresh metal. Some types of welding are less susceptible to poorly prepared surfaces than others, and some types of consumable electrodes used in shielded metal arc welding can alleviate the need to have a well prepared surface by combining with surface oxides and removing them [8].
Weld Joint Geometry
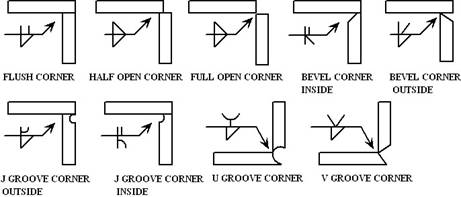
There are five main types of weld joints: Butt, Corner, Lap, Tee, and Edge [1, 8]. The joint selection is dictated by the part design requirements, what shape the stock material is available in or can be shaped into, and the required strength of the weld joint. Images below obtained from [2].
Butt Joint:
Formed when the two parts lie in the same plane and are joined at the edge.
Corner Joint:
The two parts form a right angle and are joined at the corner of the angle.
Lap Joint:
Consists of two overlapping parts.
Tee Joint:
One part is perpendicular to the other, in the shape of the letter “T.”
Edge Joint:
Parts are parallel with at least one of their edges in common and the joint is made at this common edge.
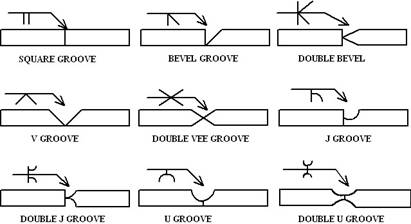
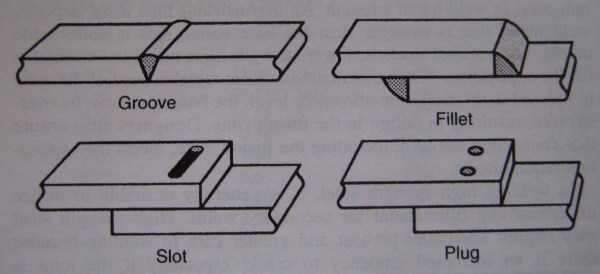
There are four main types of welds: groove, fillet, slot, and plug. By themselves, fillet welds do not fully fuse the cross-sectional areas of the parts they join, though with a sufficiently sized weld it is still possible to achieve a full-strength connection. Slot and plug are only used for connections that transfer small loads [8].
Welds can be partial joint penetration (PJP) or complete joint penetration (CJP) [8]:
Specification of weld geometry requires a joint specification (butt, corner, tee, lap, edge), type of weld and weld throat size (fillet, slot, plug, groove with groove geometry–U-groove, J-groove, etc.) and penetration depth (full or partial).
Safety
Precautions must be taken when welding. Protective clothing needs to be worn to protect the welder from the heat of the operation and any spatter which may occur–gloves, apron, good shoes. In the case of arc welding, special goggles or face masks must also be worn to protect the welder from UV damage to eyesight. Some fluxes and molten metals release dangerous fumes which must be either ventilated by a good air system in the vicinity of the work station, or be accounted for by ventilation suits or hoods if the welder has to work in an enclosed area. A series of safety recommendations is available from the American Welding Society here, and the entire pdf of their safety recommendations, ANSI Z49.1:2005, is available for download there as well.
The Various Welding Technologies
Oxyfuel Welding
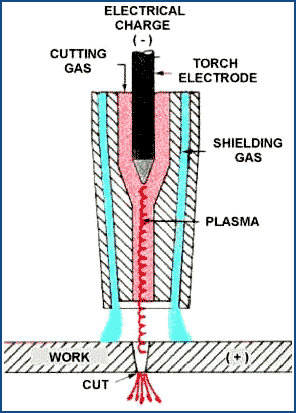
In this form of welding, oxygen is combined with various types of gases to produce a flame used in the welding process. “Cutting torches” instead use the gas to cut metal instead of joining components. By far, the most important oxyfuel welding process is oxyacetylene. Filler metals are sometimes used and are typically in the form of rod (1/16″ – 3/8″ diameter), and must be similar to the base metals. Filler rod is often coated with a “flux” that cleans the surface and helps to prevent oxidation [1]. Different torches are used depending on whether the operator is welding or cutting.
Oxyacetylene
General Info
Acetylene is not stable above 1 atmosphere. The pressurized tanks storing the gas are packed with porous material saturated in acetone which can dissolve 25 times its own volume of acetylene [1]. During the welding operation, the outer envelope of the flame spreads out and covers the the work surfaces being joined, shielding the work from the atmosphere [1].
Applications
- Suitable for low-quantity production and repair jobs (good portability of equipment) [1].
Benefits
- Equipment is relatively inexpensive and portable [1].
- Oxfuel cutting is often regarded as the most economical way to cut plate greater than 1/2″ thick [8].
- Aluminum cannot be cut with oxyfuel, and highly alloyed steels (stainless) require flux or iron-rich powder to be injected into the cutting stream to promote material decomposition [8].
Disadvantages
- Rarely used to weld plate thicker than 1/4″–arc welding has advantages in this application [1].
- Explosive hazard of normally odorless gas (commonly processed to possess a garlic odor to alert operator of leaks) [1].
- Can be automated, but usually performed manually and thus highly dependent on operator skill [1].
Equipment
- Goggles, gloves, protective clothing.
- Tank of oxygen and a tank of acetylene–different threads on each to prevent accidental connection to the wrong gas [1, 3].
- Regulators on each tank. Regulator displays tank pressure and fuel outlet pressure (pressure to hose). Dual stage regulators have a fixed intermediate pressure while allowing adjustment of pressure in hose. Needle valves at the torch adjust flow rate / flame size.
- Hoses to run to the torch. Green hose is oxygen, red is fuel.
- Welding rod compatible with the base materials, if necessary.
- Torch. Cutting torches (as opposed to a welding torch, note difference in the third image in the series above) have an “oxygen blast” trigger which ignites a burning reaction by changing heated steel to iron oxide which (with a lower melt temp) burns, adding heat and causes the cut to progress [3].
Arc Welding
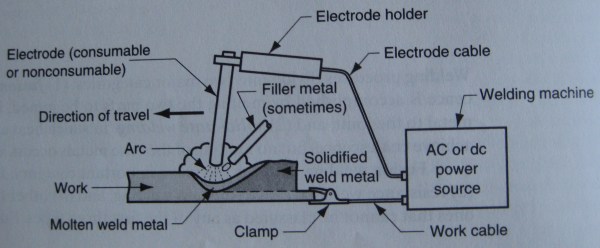
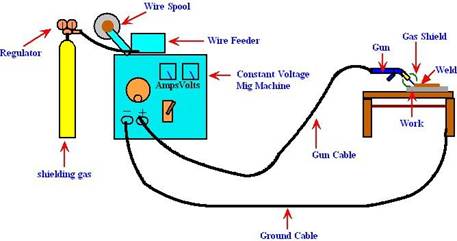
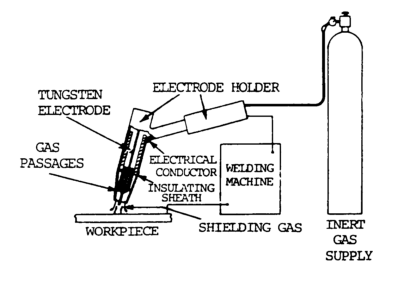
In arc welding, the material is fused through the heat of an electric arc at the work surface, stemming from an electrode held by the operator. The arc is initiated by bringing the electrode into contact with the work and then drawing it away from the surface; temperature generated can be 5500 degrees C (10,000 degrees F), sufficiently hot to melt any metal [1]. The workpiece, cables, and welding machine form a circuit which is closed by the arc spanning the distance between the workpiece and the electrode. The general configuration of an arc welding equipment setup is shown below.
Most arc welding operations employ a filler metal which is added to the weld as it is built up. The electrodes themselves are classified as consumable or nonconsumable. For nonconsumable electrodes, filler metal has to be added separately, as the electrode is not contributing material to the weld’s volume.
Shielding is also very critical for arc welding operations; the extremely high temperatures make the metal very reactive to the atmosphere, and an inert gas (argon and helium are common), a specialized flux (which prevents oxide formations from developing), or a combination of both must be employed. During welding, flux melts to become a liquid slag which covers the cooling weld, and it can be chipped off later. Flux can be applied in a granular format poured over the weld, as a stick electrode coating, or inside a tubular electrode as the electrode’s core.
The power source itself can be AC or DC current. AC machines are less expensive to purchase and operate, but are generally restricted to welding ferrous metals. DC equipment is generally noted for better arc control and and can be used on all metals with good results [1].
Shielded Metal Arc (“Stick Welding,” Consumable Electrode)
General Info
Shielded metal arc welding employs a consumable electrode–a filler metal rod coated with chemical flux. The welding stick is typically 9″ – 18″ long and 3/32″ – 3/8″ in diameter. The filler rod must be compatible with the base work metal. The flux is powdered cellulose (cotton & wood powders) mixed with oxides, carbonates and other ingredients, held together with a silicate binder [1]. This flux melts to become a slag which covers the weld as it cools.
Currents range from 30 to 300A and voltages from 15 to 45V–the power setting depends on:
- Metal being welded
- Electrode type and length
- Depth of weld penetration
Applications
- Construction
- Pipelines
- Machinery Structures
- Shipbuilding
- Fabrication job shops
- Repair work
- Can be used on steels, stainless, cast iron, certain nonferrous alloys. Seldom or not used at all on aluminum, its alloys, Cu alloys, and Ti.
Benefits
- Relatively inexpensive equipment: can be bought for a few thousand dollars.
- Equipment is portable.
- Probably the most widely used of the arc welding processes [1].
- Has earned a reputation for providing high-quality welds, dependably [8].
Disadvantages
- Usually performed manually–dependant on operator skill.
- Use of consumable electrode stick requires frequent change-out, lowering arc time; generally slower than other welding methods [1, 8]. Lowered arc-time coupled with a manual operator actually makes the total cost of stick welding generally more expensive than other welding methods [8].
- Limited current level–as electrode length decreases, resistance changes which can overheat and melt the flux prematurely.
- Necessity of chipping away flux after the weld is completed.
Flux cored arc welding is similar to stick welding, except the electrode is tubular and continuously fed–the flux is contained in the center of the electrode tube. Along with gas metal arc welding, this is one of the two most cost-effective manual arc welding processes [9]. Like stick welding, the flux core forms a protective slag over the weld. Unlike stick welding, the electrode is continuously fed through a handheld “gun,” which improves arc-time and reduces the chance of weld discontinuities. Also unlike stick welding, a shielding gas can also be fed to the weld area through the gun (carbon dioxide for mild steels; mixtures of argon and CO2 for stainless steels–remaining aware that drafty areas can negate the affect of inert gas shielding). It’s primarily used for welding steels and stainless over wide stock thicknesses and is noted for very high-quality weld joints that are smooth and uniform [1]. This method has become quite useful in shops doing semiautomatic welding, where production welds that are short, change direction, or are out of position (vertical or overhead) are done [8].
Gas Metal Arc (Consumable Electrode)
General Info
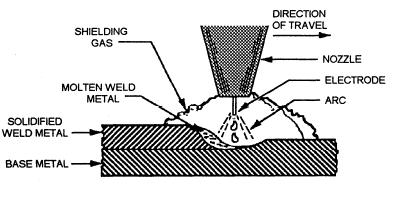
In this arc welding process, the consumable electrode is a bare metal wire which is continuously fed from a spool. Wire diameters are between 1/32″ and 1/4″, and selection of wire diameter depends on the thickness of the parts being joined and desired deposition rate [1]. The wire is fed through a gun held by the operator, which also floods the welding area with a gas for shielding the weld from the atmosphere. Selection of gases–and mixes of gases–depends on the metal being welded. Inert gases (argon and helium) are used for welding aluminum alloys and stainless. CO2 is commonly used for welding low and medium carbon steels [1]. CO2, though it is an active gas which can degrade weld mechanical properties, is a much more economical shielding gas, and can be used in pure form as the shielding gas (on “globular transfer” gas metal arc welding, [8]) or mixed with argon in ratios of CO2/Argon ratios from 25%/75% to 10%/90% (“spray arc transfer” gas metal arc welding [8]) [4], while still allowing an acceptable weld to be created. (FYI, the deposition of metal as it shorts to the base piece creates the characteristic buzzing heard when this process is performed on thin metals using “short arc transfer” Gas Metal Arc Welding, [9])
Applications
- Widely used in fabrication operations in factories for ferrous and nonferrous metals [1].
- Used extensively in sheet metal operations and thus heavily in the automobile industry [4].
Benefits
- Due to the shielding gas, there is no need to chip away flux after the weld is completed (thus, ideal for welds requiring multiple passes).
- Significant advantage in arc-time over stick welding because wire is fed continuously.
- Continuous feed wire lends itself to automation of this welding method.
- Higher deposition rates than stick welding [1].
- With Flux-cored arc welding, one of the two most cost-effective manual arc welding operations [9].
Disadvantages
- The use of a shielding gas generally makes it unsuitable for welding in drafty environments [4].
Submerged Arc (Consumable Electrode)
General Info
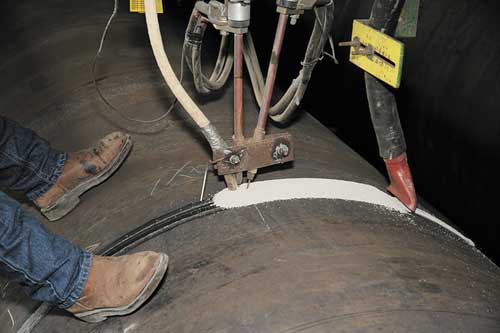
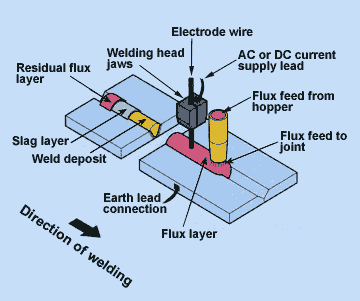
Submerged arc welding uses a continuous consumable electrode fed to the weld location which is submerged under a blanket of granular flux. The flux is fed from a hopper ahead of the position being welded. As illustrated in the first photo above, a vacuum device is also often used to pick up and recycle the flux which is not converted to slag by the heat of the arc welding process.
Applications
- Horizontal welding applications which can be easily automated.
- Frequently used in steel fabrication for structural shapes, an example being welded I-beams and heavy machinery [1, 5].
- Longitudinal and circumferential seams for large diameter pipes, tanks, and pressure vessels.
- Low-carbon, low-alloy, and stainless steels are readily welded by this process–high-carbon steels, tool-steels and nonferrous metals cannot be [1]. It can be used with Nickel based alloys [5].
Benefits
- Increases safety; blanket of flux reduces spatter [1].
- Relatively slow cooling due to slag and unused blanket of flux–this results in a high-quality weld joint noted for toughness and ductility [1].
- Very high deposition rates can be achieved–100 lb/h for this process vs. 10 lb/h for stick welding. This is aided by the fact that multiple wire electrodes can be used [5].
- Fast deposition rates also mean less energy is transferred into the base parts, which helps to prevent part distortion [8].
- Thin sheet steels can be welded at very high rates (16 ft/min) [5].
- Requires little edge preparation [5].
- Deep weld penetration is achieved, which allows small welding grooves [5, 8].
Disadvantages
- Slag must be chipped off the finished weld.
- Parts must be oriented horizontally and a backing plate is often required.
Gas Tungsten Arc (TIG, Nonconsumable Electrode)
General Info
Gas tungsten arc welding uses a nonconsumable tungsten electrode to generate the arc and an inert gas for arc shielding. Typical shielding gases include argon, helium, or a mixture of these two gases. A filler metal, if it is used, is added from a separate rod or wire. Unlike other welding operations, “scratch starting” of the arc is not recommended unless the equipment possesses the electronic equipment to enable this; touching the tungsten to the work surface can contaminate the tungsten electrode and the weld pool. Other equipment possesses the high-frequency, high-voltage circuitry required to initiate the spark at the arc gap [6]. The welding torch is equipped with a cooling system via air or water.
Applications
- Applicable to nearly all metals in a wide range of thicknesses.
- Can be used to join dissimilar metals.
- Most common application is aluminum and stainless steel. Cast irons, wrought irons, lead, tungsten, and zinc are difficult to weld [1,6].
- Aerospace relies on this process heavily, as do many industries which weld thin wall tubing, such as the bicycle industry [6].
Benefits
- Produces high-quality welds [1]. Critical repair welds (such as molding dies [1]) and root passes on pressure piping are common applications [8].
- No weld spatter because metal is not transferred across the arc gap.
- Little or no post-weld cleaning because flux is not used.
- Can be performed manually and can be automated.
- Because metal is not transferred across the arc (and many metals are not suitable as electrodes due to spattering), a wide variety of filler metals are available [6].
- TIG welds most closely match the base metal, and they are highly resistant to corrosion, cracking, and hydrogen embrittlement [6].
Disadvantages
- Cast irons, wrought irons, lead, tungsten, and zinc are difficult to weld [1, 6].
- For steel welding applications, TIG is generally slower and more costly than consumable electrode arc welding processes, except where thin sections are involved and very high-quality welds are required [1].
- Generally considered the most difficult welding process to perform manually–a precise arc gap must be maintained by the operator, and skilled welders are required for the work [6].
- Care must be taken in preparing the surfaces to be welded.
- Drafty environments make the process impractical.
Stud Welding is another arc welding process which generates the arc across a gap between the piece to be attached to the base work part, and then plunges the attachment part into the weld pool formed at the interface. This process is shown below. In high production operations, stud welding can have advantages over rivets, manual arc welding of attachments, and drilled and tapped holes [1].
Resistance Welding
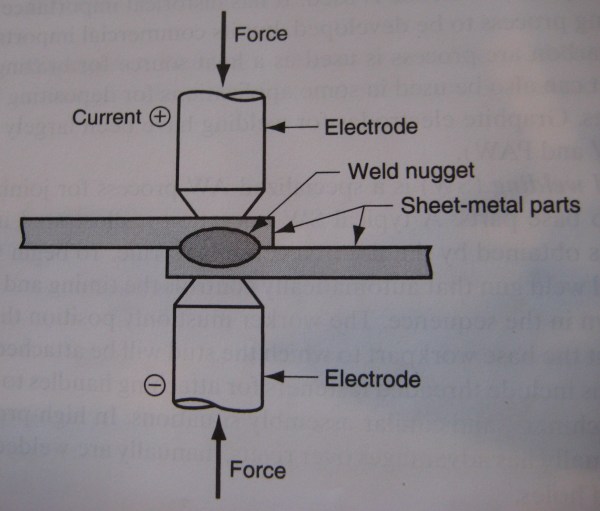
Resistance welding is a fusion-welding process which relies on resistance at the juncture of the pieces to be joined to create the weld pool and the two parts being pressed together merges the parts. Resistance welding does not use shielding gases, flux, or filler metal. The electrodes are nonconsumable. The operation results in a fused zone between the two parts called a ‘weld nugget’ in spot welding. Surface resistance generates high heat and fusion at the part interface initially, and heat is then generated and localized within the part material due to the resistance in the workpiece metal–the electrodes have high conductivity and are typically water-cooled and thus do no exhibit high internal heat generation because of this [7]. Variables in the resistance welding operation include current level, force applied at the interface, weld time, part thickness, and part material. Care must be taken in adjusting these variables to ensure that the molten pool does not extend to the surface of the parts, or obliterate the metal with too much energy (expulsion) [7]. General advantages of resistance welding [1]:
- No filler metal is required.
- High production rates.
- Lends itself to automation.
- Skilled operators not required.
- Good repeatability.
- Can produce sparks, but doesn’t generally create harmful fumes.
- Multiple layers of sheet metal can be joined–up to four [7].
- Efficient use of input energy [7]
Drawbacks include [1]:
- Equipment cost is high–typically much higher than most arc-welding operations [1, 7].
- Mostly limited to lap-joints.
Other forms of resistance-based welding besides the major types described below include:
- Flash Welding: normally used for butt joints. The surfaces to be joined are brought close together, current is applied to heat the surfaces and the parts are then forced together. Flash may need to be trimmed afterwards. The ends to be joined must have the same cross section and the equipment is expensive.
- High Frequency Resistance Welding: high frequency AC is used to heat the parts, followed by an upsetting force, which merges the parts. Frequencies are in the range of 10-500 kHz and the electrodes are in contact with the work near where the weld is performed.
- High Frequency Induction Welding: similar to high frequency resistance welding, except an induction coil generates the heat in the part; the coil does not make contact with the work. Principal applications of both of these methods are butt welding the longitudinal seams of pipes [1].
Resistance Spot Welding
General Info
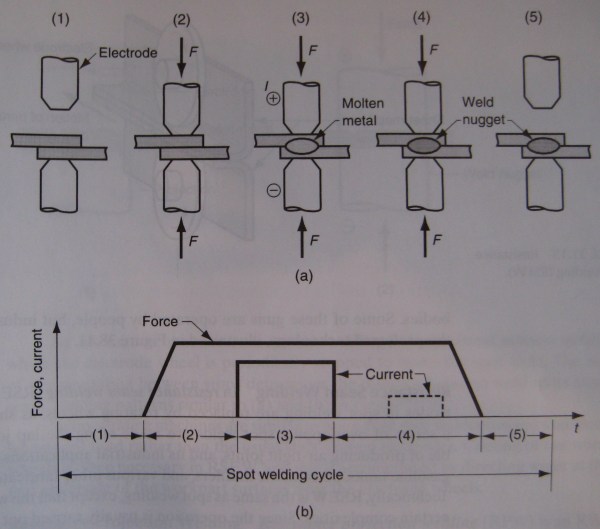
Resistance welding machines apply a compressive force across a lap joint, then apply a current to fuse the parts; the process is demonstrated above. Resistance spot welding can joint sheet-metal parts with a thickness of 3 mm (0.125″) or less [1]. The size and shape of the weld spot is determined by shape of the electrode tip, and the weld nugget is typically 5-10 mm (0.2-04″) in diameter, with a heat affected zone extending slightly beyond this [1]. Strength is comparable to the surrounding metal. Spot welding does not create watertight seals. Electrodes have water passages in them for cooling when possible, to decrease temperature and wear of the copper alloy or copper/tungsten alloy electrode tips [1]. Spot spacing must be made wide enough to prevent current from shunting through the previous made spot weld. Surfaces must be kept very clean [8].
Applications
- Resistance spot welding is frequently used in the creation of auto body components, with a robot arm moving the spot welding device about the stationary auto frame.
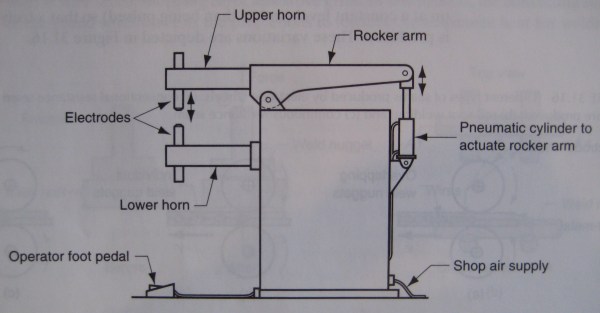
- Spot welding can be performed manually. Stationary “rocker-arm” spot welding machines are available for this purpose, and portable “spot-welding guns” are also available.
- Other applications include appliances and metal furniture–virtually anything involving the joining of sheet metal.
Resistance Seam Welding
General Info
This form of resistance welding is similar to resistance spot welding, except that the electrode tips are replaced with wheels which are capable of rolling the workpiece between them. The level of electric current or the wheel speed can be adjusted to make intermittent spot welds. Resistance seam welding can be inappropriate where sharp corners in the seam are required. To prevent warping of the parts as the seam is created, good workpiece fixturing is necessary with this method [1]. Surfaces must be kept very clean [8].
Applications
- Useful where airtight seals are needed.
- Gasoline tanks, automobile mufflers and other sheet metal containers.
Resistance Projection Welding
General Info
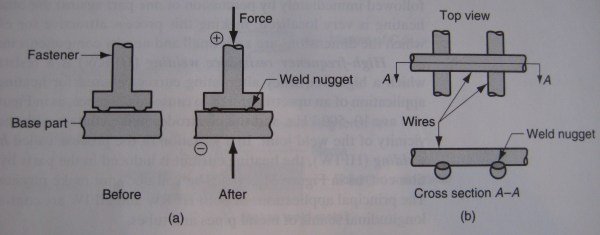
Resistance welding relies on small projections on the surface geometry of the parts to create the discrete location where the resistance weld is created. Small projections, embossments in sheet metal, or localized intersections of parts can form these small locations where the weld will form. Current is applied through the parts themselves to create the weld. Examples of this form of resistance weld are shown above.
Applications
- Cross-wire welding, illustrated in (b) of the image above, is commonly used to make wire fencing, shopping carts, and stove grills.
- Fasteners can be welded to surfaces when the fastener has machined or formed projections on its head, as in (a) of the image above.
- While it is analogous to spot welding, multiple spot welds can be performed simultaneously, which also achieves better uniformity of the welds (current would shunt through closely spaced, individually formed spot welds) [8].
Design Factors; Strength & Fatigue
Design Factors
Beyond the practical constraint of some welding processes not being appropriate for certain types of metal, economic factors generally dictate what type of welding process will be used. Factors in selecting a process include [8]:
- Base metal type
- Joint geometry (illustrated earlier)
- Section thickness
- Production quantity
- Joint access
- Position in which weld has to be formed
- Equipment availability
- Skilled personnel availability
- Location of work: in the shop or in the field
Specifying the correct size of weld is the first step in ensuring weld costs do not get out of hand [8]. The variables involved in specifying a weld’s geometry were discussed earlier, but sizing a weld properly is the responsibility of the weld engineer who has to perform weld strength calculations.
Strength Calculation
When sizing a weld for sufficient strength, the analysis begins with whether the weld is “primary” (critical weld that directly transfers full structural load–complete joint penetration groove welds make sense here) or “secondary” (merely hold parts together to form a built-up member–low loads and fillet welds are usually sufficient) [8]. With arc-welding, when the pieces are properly designed and fabricated, the weld strength properties are basically those of the individual pieces before welding [8]. Weld strength calculation then becomes an analysis of the weldment itself, as though it were constructed of a homogeneous metal. However, weld metal can be “matching,” “undermatching,” or “overmatching” which means the filler metal is equal/less/more strong than the base metal. When stronger, the area of concern for failure will likely be the fusion zone if the weld is stressed to its maximum value. When undermatching, the filler metal area must be sized up to compensate for the lower strength, relative to the work.
For many welding situations, designing to the “allowable weld strengths” specified by the American Welding Society (AWS) or American Institute of Steel Construction (AISC) will ensure the weld will deliver the mechanical properties of the base parts being joined. These organizations designate weld strengths for both steady and fatigue loads. For static loads [8]:
(Note the handy table at the base, which matches weld metal with similar steels) [8]
CJP (complete joint penetration) groove welds are considered full-strength welds and are equivalent to strength capacity of the parts they join (when filler metal strength is equivalent to the base parts). In the case of PJP (partial joint penetration) welds, the variables are more significant and the use of PJP welds frequently arises: for thick materials, a CJP weld may be too impractical and significant cost savings may be found in using a properly designed PJP weld.
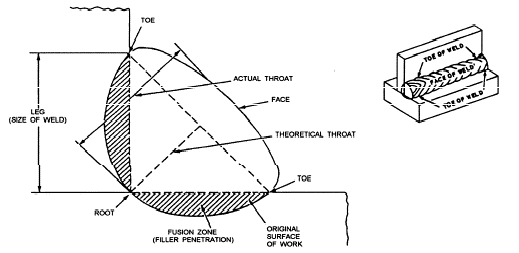
When comparing the stress in a weld of interest to the allowable stresses established by the AWS or AISC, the stress is computed on the weld’s throat. For a fillet weld, this “theoretical throat” is indicated in this diagram:
For a PJP groove weld, determining the “effective throat” is more complicated. The depth of groove penetration (designated by “S” in weld drawings) is not necessarily equivalent to the effective throat (designated by “E” in the drawings). Drawings can specify both of these dimensions, but it is mandatory for the designer to specify E, the effective throat, so that the fabricator can prepare an appropriate groove depth, S, and then perform a selected welding process correctly. Some rules for calculation of the effective throat of PJP groove welds [8]:
- For V, J, and U grooves, it is assumed the welder can easily reach the bottom of the joint, and thus the effective throat is equal to the depth of the groove.
- When stick welding a bevel groove with an angle of less than 45 degrees, 1/8″ is deducted from the groove depth when calculating the effective throat (difficulty in accessing the bottom of the narrow groove with this form of welding).
- For gas metal arc welding and flux-cored arc welding, the 1/8″ reduction only applies for bevel grooves less than 45 degree when welding in the vertical or overhead position.
And, as mentioned earler, full penetration welds are assumed to have a “throat” which is equal to the thickness of the parts they join–i.e., the parts are a homogeneous metal.
The AISC and AWS has conducted tests which show that the allowable shear value for weld metal in a fillet or PJP bevel groove weld is:
τ = 0.30 x Specified Tensile Strength of Electrode
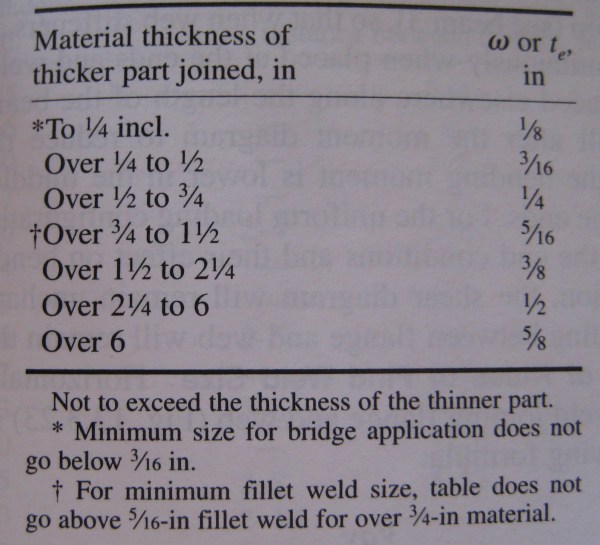
There is a minimum size for fillet and PJP groove welds, which, from AISC commentary on Table J2.4:
“Table J2.4 provides the minimum size of a fillet weld for a given thickness of the thinner part joined. The requirements are not based on strength considerations, but on the quench effect of thick material on small welds. Very rapid cooling of weld metal may result in a loss of ductility. Further-more, the restraint to weld metal shrinkage provided by thick material may result in weld cracking.”
For simple tensile, compressive, or shear loading, strength calculations are performed by dividing the load by the cross sectional area of the weld–calculated with the throat length and the lineal length of the weld line. For parallel fillet welds:
… the throat is stressed only in shear, and the max stress occurs on the 45 degree throat. For transverse fillet welds:
… the maximum shear stress occurs on the 67.5 degree throat plane, while the maximum normal stress occurs on the 22.5 degree throat [8]. Both should be computed to determine which will fail first. This is partly a consequence of the fact that max normal stress and shear occur on planes which are oriented 45 degrees relative to one another–familiar to those who have used Mohr’s circle diagram.
Beams subjected to bending exhibit internal shear; if these beams are constructed by welding plates together, then these welds can be subjected to this “horizontal shear” in the beam. To compute the horizontal shearing force in the welds exhibited in, for example, the image below [8]:
f=(V*a*y) / (I*n) lbs / linear inch
Where
- f = force on weld [lb/linear inch]
- V = total shear on section at a given position along beam (refer to shear diagram!) [lb]
- a = area of flange held by weld (refer to shaded area ‘a’ in the beams shown in the image below) [in^2]
- y = distance between center of gravity of flange area and neutral axis of whole section [in]
- I = moment of inertia of whole section [in^4]
- n = number of welds joining flange to web
Obviously, if it is possible, it behooves designers to orient welded beams such that the welds are located where there is minimal horizontal shear and intermittent welds can be employed where there is low shear.
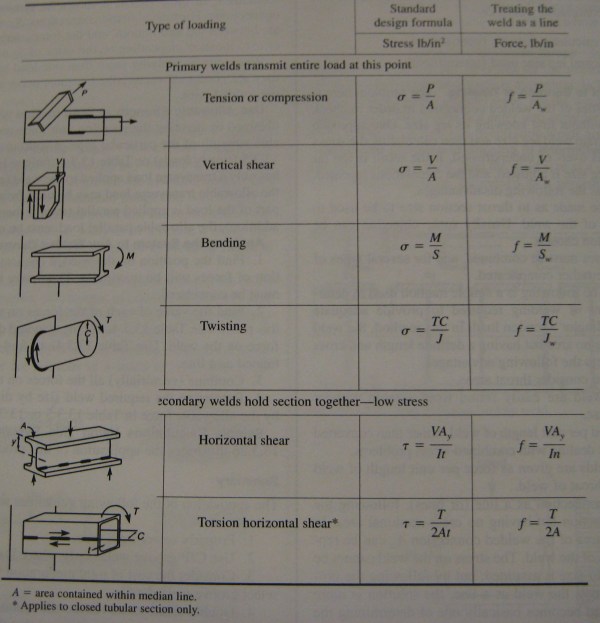
For welds subjected to bending and twisting, one way to address strength calculations is by treating the weld as a line with a definite length and cross-sectional shape. By treating the weld as a line and inserting equivalent terms for moment of inertia and section modulus based on the line properties, standard design formula can be used to calculate f, the force in lbs/lineal inch of weld. This load per unit length can then be used to compute an optimal throat length, either per AISC or AWS allowable loads, or from weld material strength data obtained elsewhere [8].
This table shows how regarding the weld as a line can then be translated into calculating section modulus and moment of inertia for some common weld outlines [8]:
This table shows how the formulas from mechanics of materials are used with the previously calculated section modulus and moment of inertias are used to compute “f,” the load in lb/inch of weld [8].
Definition of terms from the previous two tables are shown here [8]:
Of course the previous discussion is based on the assumption that quality welds are created according to the designer’s specifications. Poor welds of course produce problems with weld strength. If proper shielding is not employed, atmospheric oxygen can dissolve into the weld metal, which results in porosity as the weld cools to room temperature. Nitrogen in the atmosphere can also dissolve into the metal itself, resulting in a decrease in notch toughness of the weld metal. Post-weld inspection is common in the industry for critical welds–dye penetrants or radiography.
Fatigue Life Calculation
As mentioned earlier, allowable weld strengths in fatigue for many common welds are specified by the AWS and the AISC (for steel). AISC research was directed towards bridge construction and focused on weld shapes common to that industry with steel being the material of interest. The information presented below is a small part of an extensive AISC tabulation in “Manual of Steel Construction, 9th Ed”:
By selecting the appropriate weld geometry (the upper part of table, with the part diagrams), and then an appropriate range of cycles or the appropriate stress range (depending on what the engineer is attempting to solve for, or knows about the service life) in the lower table, then Goodman diagrams for specific: A) steels and filler material B) weld geometries and C) number of cycles are then used to ensure failure will not occur:
(Note the specified geometry: butt weld, the cycle specification of 500k-2M cycles, and the upper limits for specific, but common base metal and filler metal combinations)
This is a fairly straightforward way to predict weldment life when designing with typical materials and weld geometries, so it suffices for much of the welding which is performed in industry.
However, when atypical weld materials or weld designs are being used, the engineer will need to locate fatigue performance data for the metal of interest, and possibly do a finite element analysis of the weldment to find the weld areas which exhibit the highest stress. With a knowledge of the cyclic loading that the structure will be subjected to, the same procedure for calculating weld stress described in the static strength calculation section of this essay can be used to calculate the pertinent peak and trough stresses of the fatigue cycle.
Also, though sound weld metal has about the same fatigue strength as unwelded metal [8], the change in section at the weld joint can lower the fatigue strength of the welded area; fillet welds in lap or tee joints are an abrupt change in cross section which acts as a stress raiser. These stress raisers need to be accounted for in stress calculations for fatigue and static loading with appropriate stress-intensity factors.
References
[1] “Fundamentals of Modern Manufacturing, Materials, Processes and Systems, 3rd ed.,” Mikell P. Groover, John Wiley & Sons, Inc., c. 2007, 1022 pages.
[2] http://deltaschooloftrades.com/basic_joints.htm
[3] http://en.wikipedia.org/wiki/Oxy-fuel_welding_and_cutting
[4] http://en.wikipedia.org/wiki/Gas_metal_arc_welding
[5] http://en.wikipedia.org/wiki/Submerged_arc_welding
[6] http://en.wikipedia.org/wiki/Gas_tungsten_arc_welding
[7] http://en.wikipedia.org/wiki/Electric_resistance_welding
[8] “Marks’ Standard Handbook for Mechanical Engineers, 11th Ed.,” Eugene Avallone, Theodore Baumeister III, Ali Sadegh, McGraw Hill Company, Inc., c. 2007.
[9] “Machinery’s Handbook, 28th Ed.,” Erik Oberg, Franklin Jones, Holbrook Horton, Henry Ryffel, Industrial Press New York, c. 2008, 2692 pages.
Note: Machinery’s Handbook in particular is a great resource for the gritty details of performing welding at the level of the welding operator, including such things as recommended current settings for arc welding, and a fairly complete listing of weld symbols.
















I am wondering if you are looking for work. Intuitive Surgical ihas an amazing career opportunity for a brilliant mechanical engineer who loves robots and mechanisms.
I would love to speak with you.
Best,
MaryJane Dow
Technical Sourcer
Intuitive Surgical
408-523-7424
maryjane.dow@intusurg.com
Hi MaryJane,
Thanks for contacting me, but I think I’m all set! I’m working for a company that designs and sells automated aircraft assembly equipment, located in Washington state. I’m really enjoying what I do. I’ll keep you in mind if I have a mind to change what I’m doing though, and thanks again for contacting me.
-Justin